Where Should You Install Your Water Softener?
If you’ve purchased (or are about to) a brand new water softener, the next step toward soft water is determining where to install your water softener. This guide is designed to help you organize a checklist of all the things you’ll need for an easy DIY installation process. Learn which places around the house are suitable for your system and how a water softener will work in tandem with your other water treatment systems.
Finding the right location
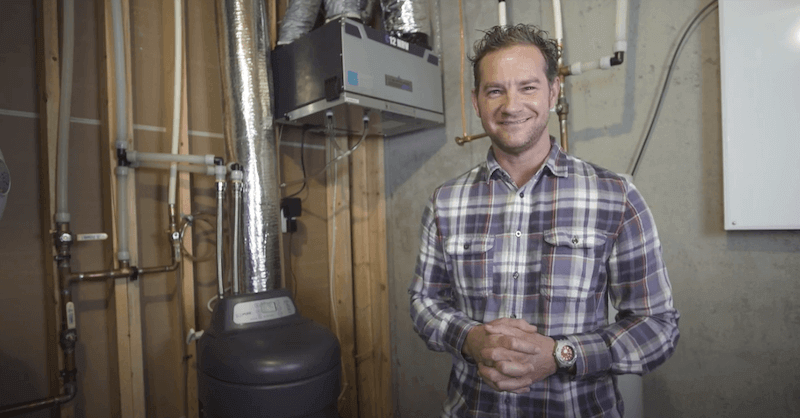
Water softeners are most often installed near the incoming main water line before your water heater. Most commonly, this is in the basement, but water softeners can also be installed in the attic, garage or even a closet dedicated to system storage. Where you install your water softener within your house will depend on a few factors, including your state’s climate, the amount of space in your home and other water treatment equipment you may already have.
Can I put my water softener outside?
This depends on the weather and climate of your area. Outdoor installation is a good option for warm, coastal areas where homes don’t have basements—but even then, there are some factors to consider. Water softeners must be kept out of direct sunlight, protected from animals and water that could damage the electronics, and should not be installed somewhere temperatures fall outside of the range of 35-100°F. If you live in a state like Florida and want to install your new water softener outside, be sure to keep it in a covered location to protect it from the elements. Be sure to refer to your system’s owner’s manual for more specific information on installation requirements.
An alternative option for warmer states is installing your water softener in your garage if it is connected to the house. If kept within the 35-100°F range, a garage offers a shaded location that’s protected from the elements.
Identifying the essentials when choosing where to install a water softener
There are a few key things that will need to be near your water softener to ensure proper performance.
- Source of electricity: You will need to have a nearby 120V electrical outlet to provide power to the system.
- Access to drainage: Your water softener should be near a laundry tub, floor drain, sump or drain pipe to carry away regeneration drainage water. The main drain out of the water softener may be run up to 8 feet above the water softener (perhaps to an available drain in the floor above your softener) or can be run horizontally to a drain up to 30 feet away. Always make sure you follow local codes for water softener drain requirements. For outdoor installations, keep in mind that water softener discharge will kill the grass and is not allowed by code in many areas.
- Proximity to water treatment systems: Installing your softener between the water heater and other treatment systems you may have (such as a sediment or iron filter system) will keep your appliances centralized. By installing in an “order of operation,” you can ensure your water will be high-quality as it runs through your home. To achieve this, in a majority of applications your sediment or specialty filtration system should treat the water first, then the water softener and finally, enter the water heater. This order of operation protects your appliances and maximizes efficiency.
If your house is pre-plumbed with a water softener loop, a plumbing feature that’s becoming increasingly common in newer homes, you have a more obvious location for installation. This feature specifies the location for connecting the water softener and separates the water flowing within your home and outside your home (you only need to soften the water in the home, not the water going to the outside faucets). While it doesn’t hurt to water your garden or perform household chores outside with softened water, it’s typically a waste of salt and water, so it’s best to keep your inside water usage separate.
Next step? Get installing.
Get the step-by-step tutorials you need to successfully complete a DIY installation. Find videos and instructions to help guide you through the process.
Get Started